
Yes, you read the title correctly. These pieces were made from paper towels. Michelle taught me how to make these in our Fiber Art Traders group. (The drab green sheets under the pendants are actually sanitary phone wipes that we use in our office, they're like baby wipes. I painted them with lumiere paint - they're for a future project.)
Instructions were to paint a paper towel with acrylic paint but I didn't have any acrylic paints so I used my left over procion dyes (another great way of using your left over dyes & not having to dump them down the drain). I then painted fusible web with lumiere paint. It helped having the paper on one side of the fusible web to keep the paint from soaking through onto another surface (wonder if you could paint Misty Fuse instead -- you'd have to lay something down for the paint to soak through & you'd have to take into account, after the paper towel & fusible web were dry, when those were fused together, you'd need a pressing sheet to protect your iron).
After the two were fused together, I then painted the side that had the fusible web again, adding highlights. This was all day project since each time I would paint, dye or rubber stamp (this was the next step after letting the painted highlights dry), I'd have to wait, so what better way to wait - watch a good movie! (I think I watched 3 movies that day.)
After the rubber stamping had dried, I added embossing powder (very lightly) onto the painted & rubber stamped surface & fused it with a pressing sheet. The final step, before sealing the piece (I used Mod Podge) was to heat it with a heat gun, which brought up the shine of the embossing powders.
While I was waiting for the pressing sheet to cool from ironing the embossing powder, so I could remove it, I then prepared my chipboard (I used the cardboard from a cereal box) which is to be adhered to the paper towel side of this work. I painted it with lumiere paint & added some rubber stamping. I think next time that I do this, I would use a heavier chipboard. The finished piece seemed a little flexible & I was expecting it to be a little firmer.
Before cutting my shapes, I sealed both sides with Mod Podge (you could use any clear medium). Michelle suggests & I agree, instead of cutting all of your finished shapes from the paper towel first, then glueing it to the chipboard, to glue the entire paper towel piece down onto a same size of chipboard, THEN cut your shapes out (it's much easier). I have an old rotary cutter that I use strictly for paper, so the cutting went quickly.
After I cut my shapes, I then added an eyelet at the top to hold a jump ring & neck cord for a pendant, added embellishments onto the piece & then sealed the edges with lumiere paint.
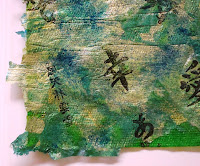
The piece below, I didn't add the chipboard to the back. This is for a journal cover & I was considering adding some machine stitching to it. Was thinking about adding Peltex to the back to give it some support since right now it feels like a really nice piece of handmade banana paper & I wasn't sure how my machine would react with it being so thin & flexible. (You can see in the bottom right corner of the closeup the paper towel that was dyed.) I'm anxious to finish this piece!!! Will post it here once it's completely done.


3 comments:
These are gorgeous! Yes - you can paint Misty Fuse! If you want to make the journal cover PT stronger, fuse it to some fabric (muslin or other). :o)
Nice, Tracy. Thanks for the explanation too. I have yet to try this technique. Michelle is generous.
You've been tagged. See my blog post for today. Playing is voluntary.
These are fabulous! I'm going to have to try this technique.
Post a Comment