Monday, October 22, 2007
Sassy!
Sorry, I just had to share these with you. Here's Taryn showing off her latest gear. Doggie goggles, aka Doggles and her dog booties, for when we take her on walks where the surface may hurt her paws.
This was actually done for a possible calendar shoot that one I my co-workers does every year, called the Dogs of Seattle. Isn't she sassy!!
Thursday, October 18, 2007
Beaded Prayer Pillows finished!
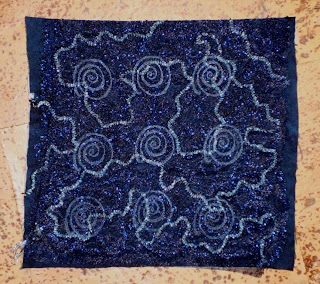
Ok, here they are!! I have to say that I'm very pleased with how they turned out!! The first picture is what I would call the fronts & the second picture is the backs, although when I created these pieces, I didn't really intend for them to have fronts or backs. And look, something other than blue, (well I had to at least do one in blue). These were done for a swap in FiberArt Traders.
The red & neon green pillow fronts (& red pillow back) I used a flower stitch, along with my love for the dyed cheesecloth. I think it just gives the pieces a nice "textury" (is that a word) look & feel. The blue pillow with the metallic threads were created all with bobbin work & then on one side I layered over the top with a rubber stamped organza. I love how the black misty fuse that I used in between the two layers helps give it a little bit of glitz.
I have to say out of all three of them, the neon green pillow is my favorite(I'm going to have a hard time parting with that one)! It's not a color I normally work in, but I have to say I'm very pleased with how it turned out. I think the biggest problem I had with it was trying to photograph it. The colors tend to lean towards the yellow side of green & every time I tried photographing it, the colors leaned more towards the blue side of green.
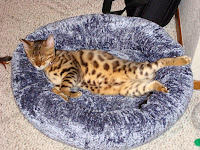
I also put small bells in two of them so they make a nice little jingle when you shake them. Seemed like a good idea at the time until my cat, Matisse, thought they were new cat toys for him. (hmmmm, now there's a thought)
Wednesday, October 17, 2007
Beaded Prayer Pillow in progress
Something other than BLUE!! I know this isn't done yet, but I had to post this in progress. I love the color in this & I'm very happy with how the stitching has turned out. This is one of the Beaded Prayer Pillows that I'm doing for a swap in FiberArt Traders. My plans are to finish this over the course of the day, then photograph and post all three here tomorrow morning!!
Monday, October 15, 2007
Flower Stitch Foot
Sorry I haven't posted in awhile, trust me, I have about 5 different pieces going right now. Unfortunately, this is the only one finished and now looking at it, I question if it really is yet? I think I want to finish off the edges differently. I'm thinking of binding it to give it a crisper but softer edge (did that make any sense?).
The round stitching is created by what is called a Flower Stitch Foot that you attach to your sewing machine. When I first took it out of the box, I really wondered how this huge foot attachment was going to successfully fit my machine. It took some trial and error, but I finally got it to fit properly. Next was determining what stitch and thread tension to use. The directions that came with the foot states to turn your tension as far down to zero as you can and to put the stitch on a zig zag stitch, (I found out with doing the solid dots, it works better to turn the stitch length down as far as you can as well).
Again, with some trial, error & patience, I finally got the stitch to work. When they say to back the material with some type of stabilizer, make sure you do this................... (this was part of my trial & error). I thought if I just doubled the fabric that this would be enough, but the zig zag stitches either bunched the fabric up under the foot or it skipped stitches. Once I figured out that yes, you need the stabilizer, the stitch worked!!!
This foot can create 3 different sized circles that you can adjust with just the turn of a screw on the foot. I know there are a lot of other different stitches out there to try, (check out this site) but I just haven't tried them out yet.
And I know, I know, another blue piece? It's much easier for me to try new techniques in a color that I'm comfortable with first, so I'm not figthing, trying the new technique AND working with a color I'm not used to. Right now, I'm working on these beaded prayer pillows for a swap in FAT & I tried making one all in reds & oranges & I have to tell you, for a finished piece that only turned out about 2.5" by 2.5", I really struggled through it. It was a color I wasn't used to working in & I have to tell you, I doubted myself throughout the entire piece, that visually, it was going to turn out ok. Not until I finished stitching up the little pillow did I realize, "you know, this actually turned out really nice". (As soon as I get these 3 little pillows finished - hopefully sometime this week- I'll post them here for you.)
Tuesday, October 9, 2007
Who Says I'm Fat?
Friday, October 5, 2007
Too Hip to Be Square
This was one of my very first attempts at making a small wall quilt & I'm pretty happy with the way it turned out. It's roughly 11" by 13". I used hand dyed flannel & dyed cheesecloth. The flannel gives off an appearance of a soft muted "fuzziness" which to me, makes me want to run my hands over it.
And what did I learn from this piece? PATIENCE!! I paper pieced this & since it had hard vertical & horizontal lines, I was constantly tearing out seams & re-sewing them back together, trying to keep those lines straight!!
(This piece was in a show, Doing Small Things, sponsored by the Fiber Arts Connection of Southern California, that traveled around the US for the last half of last year & the first part of this year.)
Baby quilts
Undulating Curves
for Carter
I created both of these for a couple of friends of mine for their new babies. I used store bought fabrics for both. I know, I know, being a hand dyeing snob, why didn't I use my own fabric? I just had this underlying fear of "what if I didn't get all of the dye residue washed out of the fabric & mom comes into the room to see that little Johnny had been drooling on the quilt & now has purple dye on his face?" I would never be able to forgive myself.
The blocks are hand stitched together which I love doing. It's so relaxing to sit & watch TV & hand stitch the pieces together. The seams match up SO much nicer than if I would try it with a sewing machine. The quilt tops, however, are machine quilted (that is one place where I don't have the patience to try to attempt hand work) I'm more into creating the design & sewing the design together. The quilting part, I don't really enjoy.
Thursday, October 4, 2007
Toilet Tissue Paper Study
I had so much fun with these! I tried all different types of techniques. I learned of this from the Surface Design group that I belong to (GREAT group of ladies!!) The little ones in the first picture were done on about a 1" by 1" rubber stamp. The second picture, that stamp was about 3.5" by 3.5". In short, I used toilet paper a little bit bigger than the stamp and created layers of wet toilet paper with glue and water (to help seal the layers together) on top of each other and created these wonderful little paper casts.
With these two, I used dyed threads that came from some bamboo fabric that I had dyed earlier. The top squiggle, I laid the thread on the rubber stamp first then a layer of tp & then between each layer I added more dyed threads, the moistness from the toilet paper made the threads bleed which I found very interesting. The bottom squiggle I placed the toilet paper first on the rubber stamp followed by layers of thread & then more toilet paper. I liked this since it gave off a muted appearance of the thread.
I LOVE these!! I created these by starting with a layer of moist toilet paper then I added drops of turquoise & navy MX dye, followed by more layers of wet gluey (is that a word) toilet paper & dyes. The moistness of the toilet paper made the dyes spread, which I thought turned out wonderfully!!
With these 3 pictures I tried adding seed beads & sequins. The first picture (with the white squiggle) the beads remind me of a dalmation & it's spots. I placed the beads on the rubber stamp first then added the toilet paper so the beads would remain on the surface. I think it worked better with the dyed squiggle in that picture. In the second picture I tried burying the beads under the first layer of toilet paper & in the third picture, I placed sequins on the surface of one squiggle & on the other, under the first layer of toilet paper (which I think kind of gave it a freckled look) To keep the beads & sequins from falling off of the pieces, I carefully painted the surface with Mod Podge to seal them in.
I like how the bottom squiggle turned out. I did this by not placing as much dye on the toilet paper so it wouldn't bleed as much.
Here's is one of the toilet paper tissue casts that I used in an inchie I did for a Surface Design swap.
If you would like to learn how to do this, please check out a fellow artist friend's of mine blog. http://stitchandpaint.blogspot.com/ Michelle explains a step by step process which is very easy to learn.
Wednesday, October 3, 2007
The children in my life!
My husband, Daryl & I decided long ago that we never wanted to have children & so these 3 have stepped in to fill that void. And let me tell you, there is NEVER a dull moment with these three.
From left to right: Sydney is an 11 year old Abyssinian that we've had since he was 6 months old. In the winter he likes to sleep with us under the covers at night. Taryn is our four year old German Pinscher, she thinks she is a still a puppy (not sure Daryl & I could go through the puppy stage again). Matisse is our newest addition to the family. He's an 7 1/2 month old Bengal kitten. He's a talker and he LOVES the water, I think eventually, he'll end up in the shower with me someday (I think he thinks, he's part dog, like his sister Taryn) who are best buds.
These children of ours are just absolutely wonderful & I wouldn't have it any other way!